Shot Group Analysis: The Complete Guide
April 19, 2026 · 12 min read
Every time you fire a group of shots at a target, the result tells you something specific about your technique. Shot group analysis is the process of measuring, classifying, and interpreting those results so you can make targeted improvements instead of guessing what went wrong.
This guide covers everything: how to measure a group, what the numbers mean, how to identify patterns, what causes each pattern, and how to use the data to actually get better. Whether you shoot pistol, rifle, or both, the fundamentals are the same.
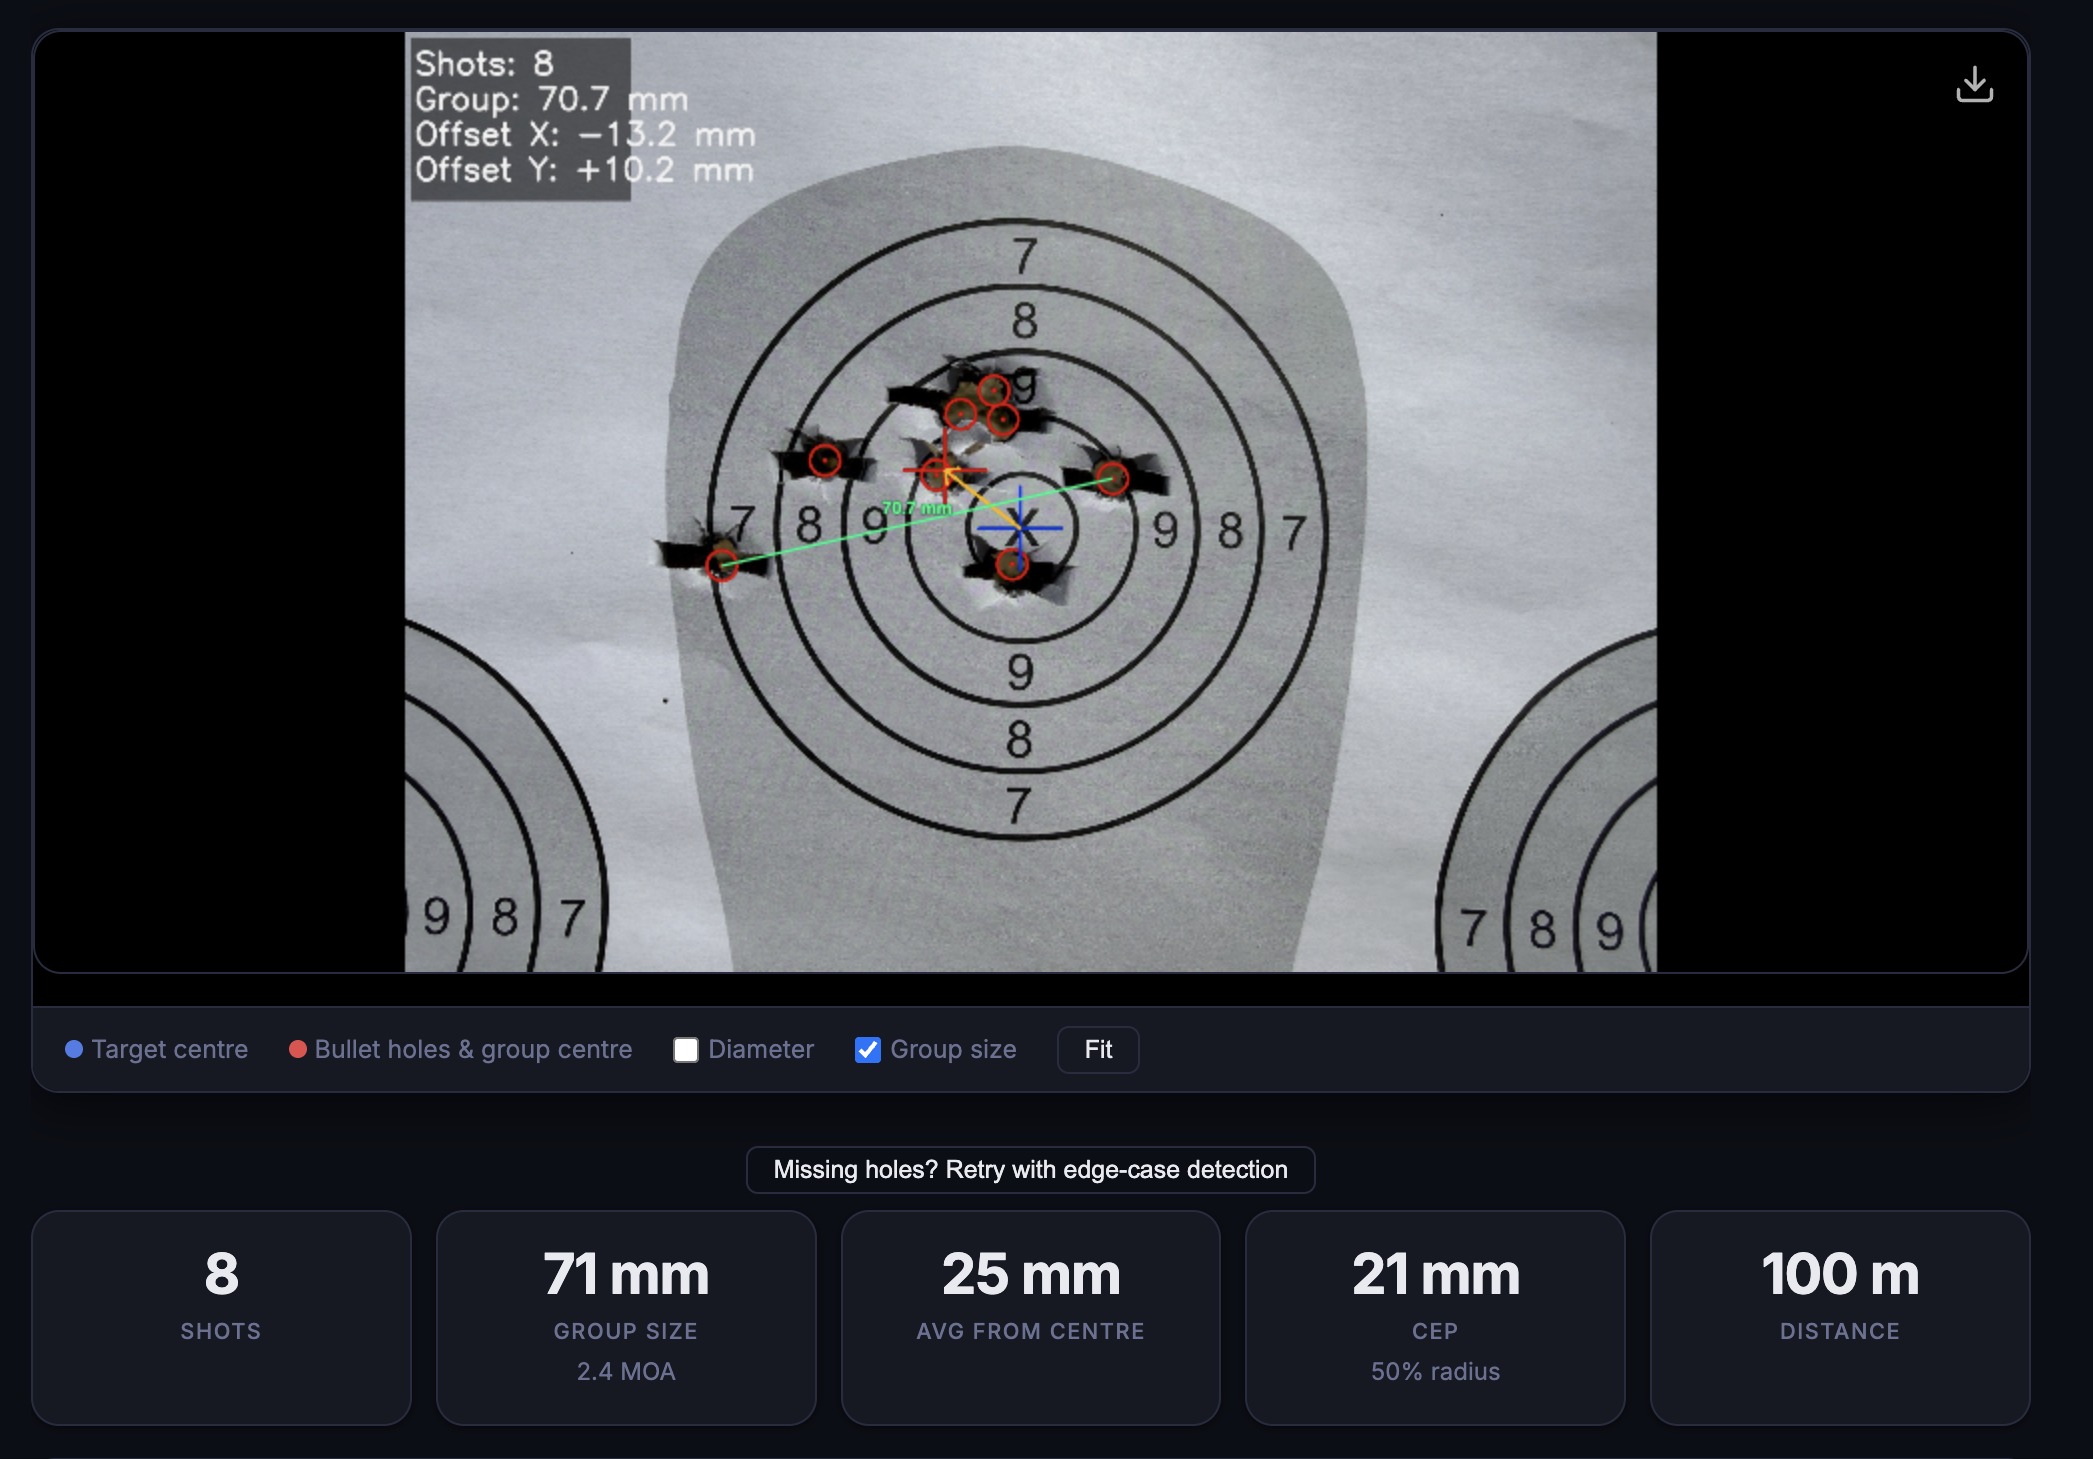 Rifle target at 100m - 8 shots detected, 71mm group (2.4 MOA), 21mm CEP
What Is Shot Group Analysis?
Shot group analysis is the systematic measurement and interpretation of where your bullets hit relative to the target center and to each other. It answers three questions:
- How tight is my group? (precision - are shots close together?)
- How close to center? (accuracy - are shots where you aimed?)
- What pattern are they forming? (diagnosis - what's causing the misses?)
A shooter can be precise but not accurate (tight group, wrong location), accurate but not precise (centered but scattered), or both. Distinguishing these tells you whether you have a technique problem, a zero problem, or both.
How to Measure Group Size
Group size is measured as extreme spread: the distance between the centers of the two farthest-apart bullet holes. This is the standard measurement used in competitive shooting, military testing, and ammunition evaluation.
Measuring by hand
Place a ruler or calipers across the two widest holes, measuring center-to-center. If you measure edge-to-edge, subtract one bullet diameter to get the center-to-center distance. For a 9mm round, that means subtracting 9mm from your edge-to-edge measurement.
Measuring from a photo
If you photograph your target, you need a reference distance to calibrate. This could be a known target dimension (like the 10-ring diameter) or an object of known size placed next to the target. Software tools like Shotalyze handle this automatically: you upload the photo, the app detects every bullet hole using computer vision, and calculates group size using the target's known dimensions as the reference scale.
Why extreme spread matters
Extreme spread is simple and universal. It has one weakness: a single flyer (outlier shot caused by a flinch or bad trigger pull) can make a group look much worse than it is. That is why experienced shooters also look at mean radius and CEP alongside group size.
Understanding MOA
MOA stands for Minute of Angle. One MOA equals 1/60th of a degree, which works out to approximately:
- 1.047 inches at 100 yards (often rounded to 1 inch)
- 29.1 mm at 100 meters
MOA is useful because it normalizes group size across distances. A 2-inch group at 50 yards is 4 MOA. A 4-inch group at 100 yards is also 4 MOA. The shooter's precision is the same in both cases; only the distance changed.
The formula: MOA = (group size / distance) x 3438 (when both are in the same unit).
For pistol shooters at typical ranges (7-25 yards), MOA numbers tend to be large. That is normal. MOA is most intuitive for rifle shooters at 100+ yards, but it works at any distance.
CEP: A Better Precision Metric
CEP stands for Circular Error Probable. It is the radius of the smallest circle centered on the group's mean point of impact that contains 50% of your shots. Where group size is dominated by your worst shot, CEP represents your typical shot.
Example: if you fire 10 shots and your CEP is 15mm, that means 5 of those shots landed within 15mm of the group center. The other 5 were farther out, but CEP tells you what your "normal" performance looks like.
CEP is used in military and competitive contexts because it's more stable than extreme spread. Adding one flyer barely changes CEP but can double your group size. If you are tracking improvement over time, CEP is the better number to watch.
Shotalyze calculates CEP automatically on every analysis, alongside group size, mean radius, and center offset.
Center Offset and Accuracy
Center offset is the distance between the target center and the mean point of impact (the centroid of all your shots). This tells you how far off your zero is, independent of group size.
A group can be tight but offset. In that case, you do not have a technique problem - you have a zero problem. Adjust your sights or scope and the group moves to center without any change in shooting form.
For scope users, the offset can be converted directly into turret click adjustments. If your scope has 1/4 MOA clicks and your group is 2 MOA left, you need 8 clicks right. Shotalyze calculates this automatically when you set your scope's click value on a gun - it tells you exactly how many clicks of elevation and windage adjustment you need.
 Automatic scope adjustment: Shotalyze calculates the exact turret clicks from your group offset
Common Shot Patterns and What They Mean
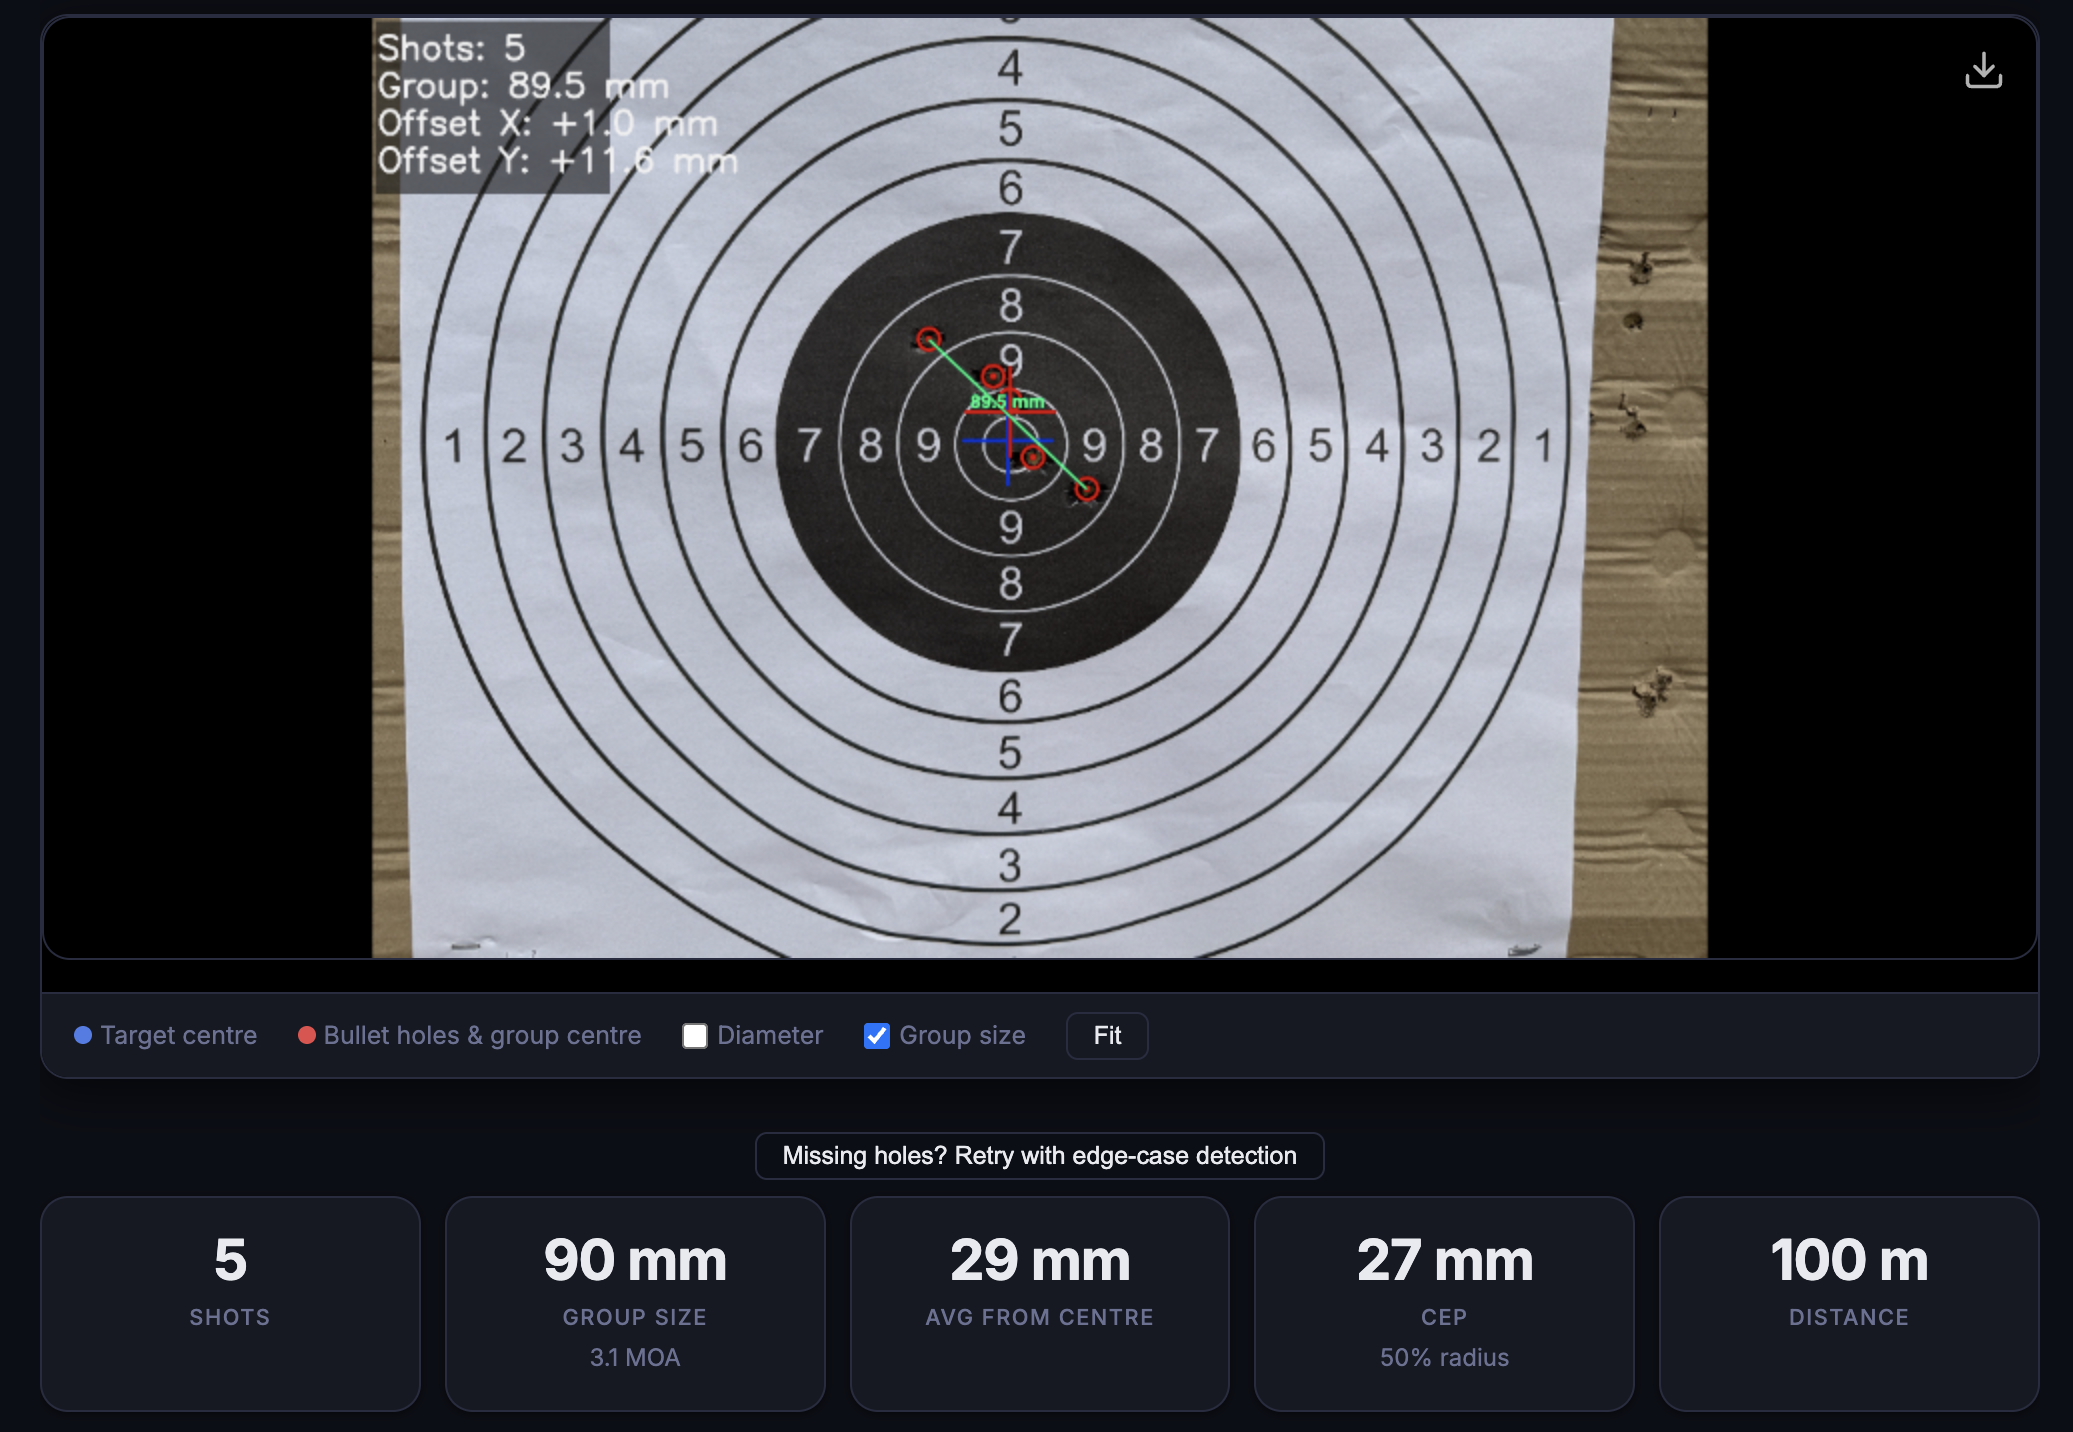 Centred group at 100m - 5 shots, 90mm group (3.1 MOA). Precision is good; accuracy needs zero adjustment.
When multiple shots cluster in the same off-center position, that pattern has a cause. Here are the most common patterns and what produces them. (For left-handed shooters, mirror the horizontal direction.)
Low-left (right-handed) / Low-right (left-handed)
The single most common pistol error. Caused by trigger finger mechanics pulling the muzzle sideways, anticipation of recoil pushing the muzzle down, or grip imbalance letting the gun torque. Most shooters have a combination of two of these. See our detailed guide to fixing low-left shots for specific drills.
Low
Shots land below center. Usually caused by anticipation (pushing the gun down before the shot breaks) or breaking the wrist downward during the trigger press. The ball-and-dummy drill is the fastest diagnostic: load a mix of live and snap-cap rounds. If the muzzle dips on the snap cap, anticipation is confirmed.
High
Shots above center. Often caused by heeling (pushing the palm forward into the grip just before the shot) or lifting the head off the sights in anticipation. Can also indicate the gun is zeroed incorrectly.
Left or right (horizontal shift)
Entire group shifted sideways. Check sight zero first. If zero is correct, likely caused by trigger finger placement (too much or too little finger on the trigger) or inconsistent grip pressure between hands.
Scattered (no pattern)
Shots spread across the target with no clear cluster. This is usually a fundamentals problem: inconsistent grip, sight alignment, or trigger press from shot to shot. The fix is to slow down, focus on one fundamental at a time, and reduce variables. Start with grip consistency.
Vertical stringing
Shots form a vertical line. For rifle shooters, this often indicates inconsistent breathing (shots fired at different points in the breath cycle) or inconsistent cheek weld. For pistol, it usually means varying grip pressure or trigger press speed inconsistency.
Horizontal stringing
Shots form a horizontal line. Typically caused by trigger finger mechanics (pulling the muzzle sideways to varying degrees) or wind (for outdoor shooting at distance). Indoors or at close range, focus on trigger control.
How to Analyze a Target: Step by Step
Here is the process for getting useful data from every target you shoot:
- Photograph the target straight-on with decent lighting. Avoid angles; shoot the photo square to the paper so distances are not distorted.
- Count and locate every hole. Manually, this means marking each hole. With a tool like Shotalyze, upload the photo and bullet holes are detected automatically using computer vision.
- Measure group size (extreme spread, center to center of the two farthest holes).
- Identify the pattern. Is the group centered, shifted in one direction, scattered, or strung vertically/horizontally?
- Calculate center offset. How far is the group centroid from the target center?
- Look up the cause. Match the pattern to the biomechanical causes listed above.
- Record everything. Log the date, gun, ammo, distance, conditions, and results. Without logging, you cannot track improvement.
Steps 2 through 6 are what Shotalyze automates. You upload a photo, it detects holes, measures the group, classifies the pattern, and gives you the specific causes and drills. Step 7 happens automatically when you link the analysis to a diary entry.
Tracking Progress Over Time
 Group size trend over sessions - the line going down means you're improving
A single analysis is a snapshot. The real value comes from tracking many sessions and looking for trends.
The key metrics to track over time:
- Group size trend - is your extreme spread getting smaller?
- CEP trend - is your typical shot getting tighter?
- Pattern frequency - are you seeing the same error pattern less often?
- Center offset - is your mean point of impact staying closer to center?
If your group size is shrinking but your pattern has not changed, you are getting more consistent at the same error. That means you need to address the root cause, not just practice more. See our guide on tracking your shooting progress for a detailed approach to logging and goal-setting.
Ammo and Equipment Variables
Not all group sizes are created equal. Two variables affect results independent of your technique:
Ammunition
Different ammo produces different group sizes from the same gun and shooter. Match-grade ammunition is manufactured to tighter tolerances and typically produces smaller groups. If you are comparing sessions, use the same ammo or track which ammo was used in each session. Tools that support per-ammo analytics (like Shotalyze's ammo management) let you compare group sizes across ammo types to see which performs best in your gun.
Distance
A 30mm group at 7 yards is very different from a 30mm group at 25 yards. Always record shooting distance and use MOA to compare across distances.
Gun
Mechanical accuracy varies between guns. A tuned competition pistol will outgroup a stock carry gun. Per-gun tracking lets you separate your improvement from equipment differences.
Drills That Fix Common Problems
Once you know your pattern, use targeted drills instead of just shooting more rounds:
- Wall drill (dry fire) - for trigger control. Aim at a spot on a wall, press the trigger without moving the sights. If the front sight dips or shifts, you are pulling/pushing.
- Ball-and-dummy drill - for anticipation. Mix live rounds with snap caps. When you flinch on the dummy round, you have confirmation of the problem and immediate feedback.
- Penny drill (dry fire) - balance a coin on your front sight and press the trigger. If the coin falls, your press is disturbing the gun.
- One-hole drill - fire 5 rounds trying to put all of them through the same hole. Forces slow, deliberate shooting with maximum focus on fundamentals.
- Dot torture - a structured drill that tests multiple skills (draw, reload, transitions, strong hand, weak hand) with pass/fail scoring at specific distances.
The key is matching the drill to the diagnosed cause, not just doing random practice. If your pattern says trigger control, do the wall drill. If it says anticipation, do ball-and-dummy. Our low-left guide has more detail on which drill targets which root cause.
Tools for Shot Group Analysis
You can analyze shot groups with nothing more than a ruler, a notebook, and the knowledge in this guide. Many shooters do exactly that and improve steadily.
Software tools add speed and consistency. Instead of measuring by hand and looking up patterns in a chart, you take a photo and get instant results. The main advantage is not the measurement itself - it is that automation removes the friction from logging. When analysis takes 2 seconds instead of 5 minutes, you actually do it every session, and the data accumulates into trends you can act on.
Shotalyze is built specifically for this workflow. Upload a target photo, get automatic hole detection, group measurement, pattern classification, and drill recommendations. Everything is logged to a shooting diary with trend charts, heat maps, and session scoring. It is free to start with, with paid plans for shooters who want per-gun analytics, ammo tracking, and scope zeroing calculations.
Summary
Shot group analysis is not complicated once you know what to measure and what the patterns mean:
- Group size (extreme spread) tells you how precise you are
- CEP tells you how precise your typical shot is, filtering out flyers
- Center offset tells you how accurate your zero is
- MOA normalizes measurements across distances
- Pattern tells you what to fix (trigger, anticipation, grip, breathing)
- Trend data tells you whether your fixes are working
The shooters who improve fastest are not the ones who shoot the most rounds. They are the ones who analyze every group, diagnose the pattern, practice the right drill, and track whether it worked. That cycle - shoot, measure, diagnose, drill, repeat - is what turns rounds downrange into actual skill.