How to Read Your Shot Groups
Every target you shoot tells a story. The holes in the paper are not random. They reflect your grip, trigger press, breathing, sight alignment, stance, and follow-through. If you know how to read them, your target becomes a diagnostic tool that shows you exactly what to work on next.
This guide covers the fundamentals of reading shot groups, from measuring group size to recognizing common patterns. Whether you are new to shooting or preparing for competition, understanding your groups is the fastest path to improvement.
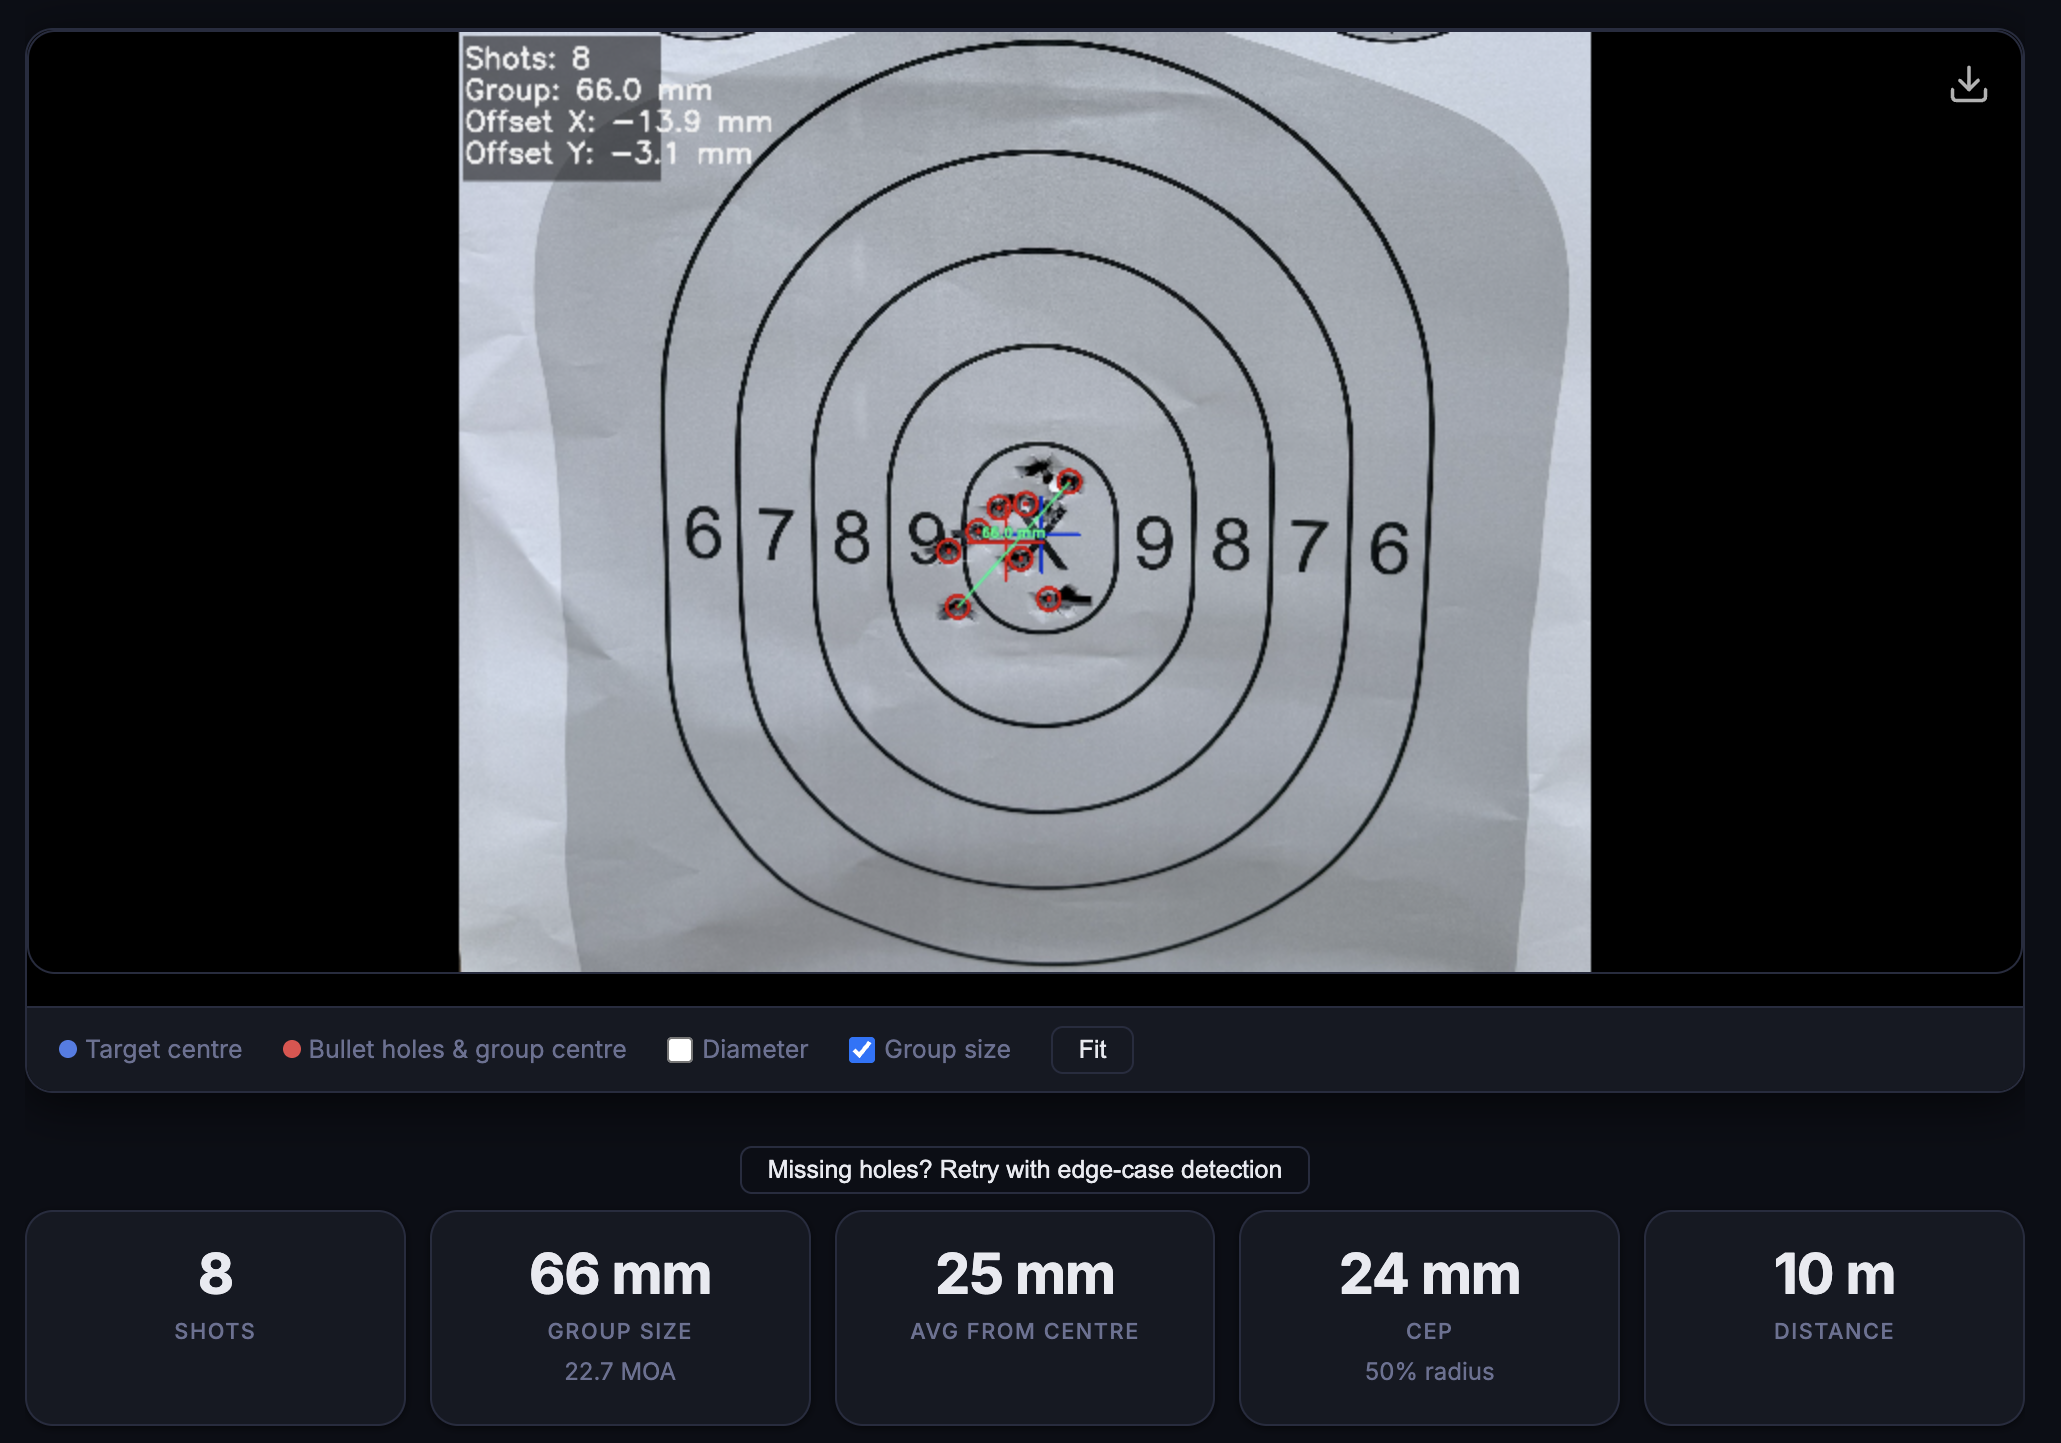 8 shots detected automatically - 66mm group, 24mm CEP, offset from centre measured
What Is a Shot Group?
A shot group is a collection of shots fired at the same point of aim under the same conditions. Typically this means 5 to 10 rounds fired at a single target without adjusting your sights or point of aim between shots.
The shape, size, and position of the group reveal two distinct things:
- Precision - how consistently you shoot. A tight cluster (regardless of where it lands) means your mechanics are repeatable.
- Accuracy - how close the group center is to your intended point of aim. A group centered on the bullseye is accurate, even if individual shots are spread out.
You can be precise without being accurate (tight group, wrong location), accurate without being precise (shots scattered around the bullseye), or both. The goal is both, but precision comes first. You can always move a tight group with sight adjustments. You cannot fix scattered shots with clicks on a turret.
Measuring Group Size: Extreme Spread
The most common way to measure a shot group is extreme spread: the distance between the centers of the two farthest-apart holes. Find the two shots that are the greatest distance from each other, then measure center-to-center. That number is your group size.
A few practical notes on extreme spread:
- Measure center-to-center, not edge-to-edge. If you are using calipers on the paper, measure the outside edges of the two farthest holes and subtract one bullet diameter.
- Always note the number of shots. A 5-shot group and a 20-shot group cannot be compared directly because more shots give outliers more chances to appear.
- A single flyer can dramatically inflate extreme spread. Some shooters exclude the worst shot and report "best 4 of 5," but this can mask real issues. Be honest with yourself.
Extreme spread is simple and widely understood, which is why it remains the standard. But it has a weakness: it only considers two shots out of the entire group, ignoring all the others.
What MOA Means and Why It Matters
Shooters often express group size in MOA (Minute of Angle) rather than inches or millimeters. One MOA equals approximately 1.047 inches at 100 yards, or roughly 29 millimeters at 100 meters. For practical purposes, most shooters round this to 1 inch at 100 yards.
MOA scales linearly with distance:
- At 25 yards, 1 MOA is about 0.26 inches (6.6 mm)
- At 50 yards, 1 MOA is about 0.52 inches (13.2 mm)
- At 100 yards, 1 MOA is about 1.05 inches (26.7 mm)
The reason MOA matters is comparison. If you shoot a 2-inch group at 50 yards, that is 4 MOA. If your friend shoots a 3-inch group at 100 yards, that is roughly 3 MOA. Your friend's group is actually tighter relative to distance, even though the physical measurement is larger. Without MOA, you cannot compare groups shot at different distances.
To convert your group size to MOA: divide the group size (in inches) by the distance (in hundreds of yards). A 1.5-inch group at 25 yards is 1.5 / 0.25 = 6 MOA.
Common Patterns and What They Mean
Group position and shape reveal specific issues with your shooting technique. Here are the patterns you will see most often:
Low-left (right-handed shooter)
This is the single most common pistol shooting error. Shots consistently landing low and to the left typically indicate trigger finger issues: too much finger on the trigger, jerking or slapping the trigger instead of pressing smoothly, or anticipating recoil and pushing the muzzle down. For left-handed shooters, the equivalent pattern is low-right. For a deep dive into causes and drills, see our guide on how to fix low-left shots.
Scattered group, centered on target
Shots spread widely around the bullseye with no clear directional bias suggest inconsistent fundamentals. Grip pressure varies shot to shot, sight picture is not repeatable, or your stance shifts between shots. This pattern often appears with newer shooters who have not yet built muscle memory. The fix is deliberate dry-fire practice focusing on one fundamental at a time.
High group
A group that consistently lands above your point of aim can indicate several things. If it is a tight group that is simply high, your sights may need adjustment. If the shots are somewhat scattered high, you may be lifting your head to see the target (breaking cheek weld), or anticipating recoil by raising the muzzle just before the shot breaks.
Vertical stringing
Shots strung out vertically in a tall, narrow pattern usually point to breathing control or follow-through problems. If you are shooting between breaths inconsistently, the natural rise and fall of your chest moves the muzzle up and down. Inconsistent follow-through, where you drop the gun or look up at the target immediately after firing, also creates vertical dispersion.
Horizontal stringing
A wide, flat group spread left-to-right typically indicates inconsistent trigger press or varying grip pressure. If your trigger finger pushes the muzzle sideways during the press, you get horizontal movement. Wind can also cause horizontal stringing at longer distances, but at typical pistol ranges (7 to 25 yards), wind is rarely the culprit.
Recognizing these patterns is the first step toward fixing them. A tight low-left group needs a completely different correction than a scattered group with no pattern. If you upload your targets to Shotalyze, the app classifies the pattern automatically and recommends specific drills matched to the issue.
CEP: A Better Precision Measure
Extreme spread has a significant limitation: it depends entirely on the two worst shots. Fire one flyer and your "group size" doubles, even if the other nine shots are in a single ragged hole.
CEP (Circular Error Probable) solves this by considering every shot. CEP is the radius of the smallest circle, centered on the group's center, that contains 50% of your shots. Think of it as the "typical" radius your shots fall within.
For example, if you fire 10 shots and your CEP is 12 mm, that means 5 of your 10 shots landed within a 12 mm radius of the group center. The other 5 were farther out, but they do not dominate the measurement the way they would with extreme spread.
CEP is more robust because:
- It is not destroyed by a single flyer
- It reflects your typical precision, not your worst-case dispersion
- It is the standard precision metric used in military and competitive shooting circles
Tracking CEP over time gives you a reliable picture of whether your shooting is actually improving. A shrinking CEP means your consistency is genuinely getting better, not just that you got lucky and avoided a flyer.
What to Do with This Information
Reading your shot groups only matters if you act on what they tell you. Here is a practical workflow:
- Shoot a deliberate group. Fire 5 to 10 rounds at the same point of aim, focusing on your fundamentals. Do not chase individual shots.
- Measure. Note the extreme spread and, if you have the tools, calculate CEP. Record the distance, number of rounds, and conditions.
- Identify the pattern. Is the group centered, offset in a consistent direction, or scattered? Is it round, vertically strung, or horizontally spread?
- Diagnose. Match the pattern to probable causes using the guide above.
- Pick one thing to fix. Do not try to correct everything at once. If your group is low-left, focus entirely on trigger press for your next session.
- Track over time. One group is a data point. Ten sessions of groups shot under similar conditions is a trend. Improvement shows up in the trend, not in any single session.
The shooters who improve fastest are the ones who treat every target as feedback rather than a score. Read the pattern, understand the cause, work the drill, and measure again. For more on building a consistent tracking habit, see our guide on tracking your shooting progress.
Skip the ruler: Upload a target photo to Shotalyze and get automatic group size, pattern classification, and coaching tips in seconds.