How to Fix Low-Left Shots
April 19, 2026 · 6 min read
Low-left is the single most common miss pattern for right-handed pistol shooters. If you pull your targets and see a cluster sitting at about 7 or 8 o'clock, you are not alone. The good news: this pattern has a small number of root causes, all of them fixable with deliberate practice.
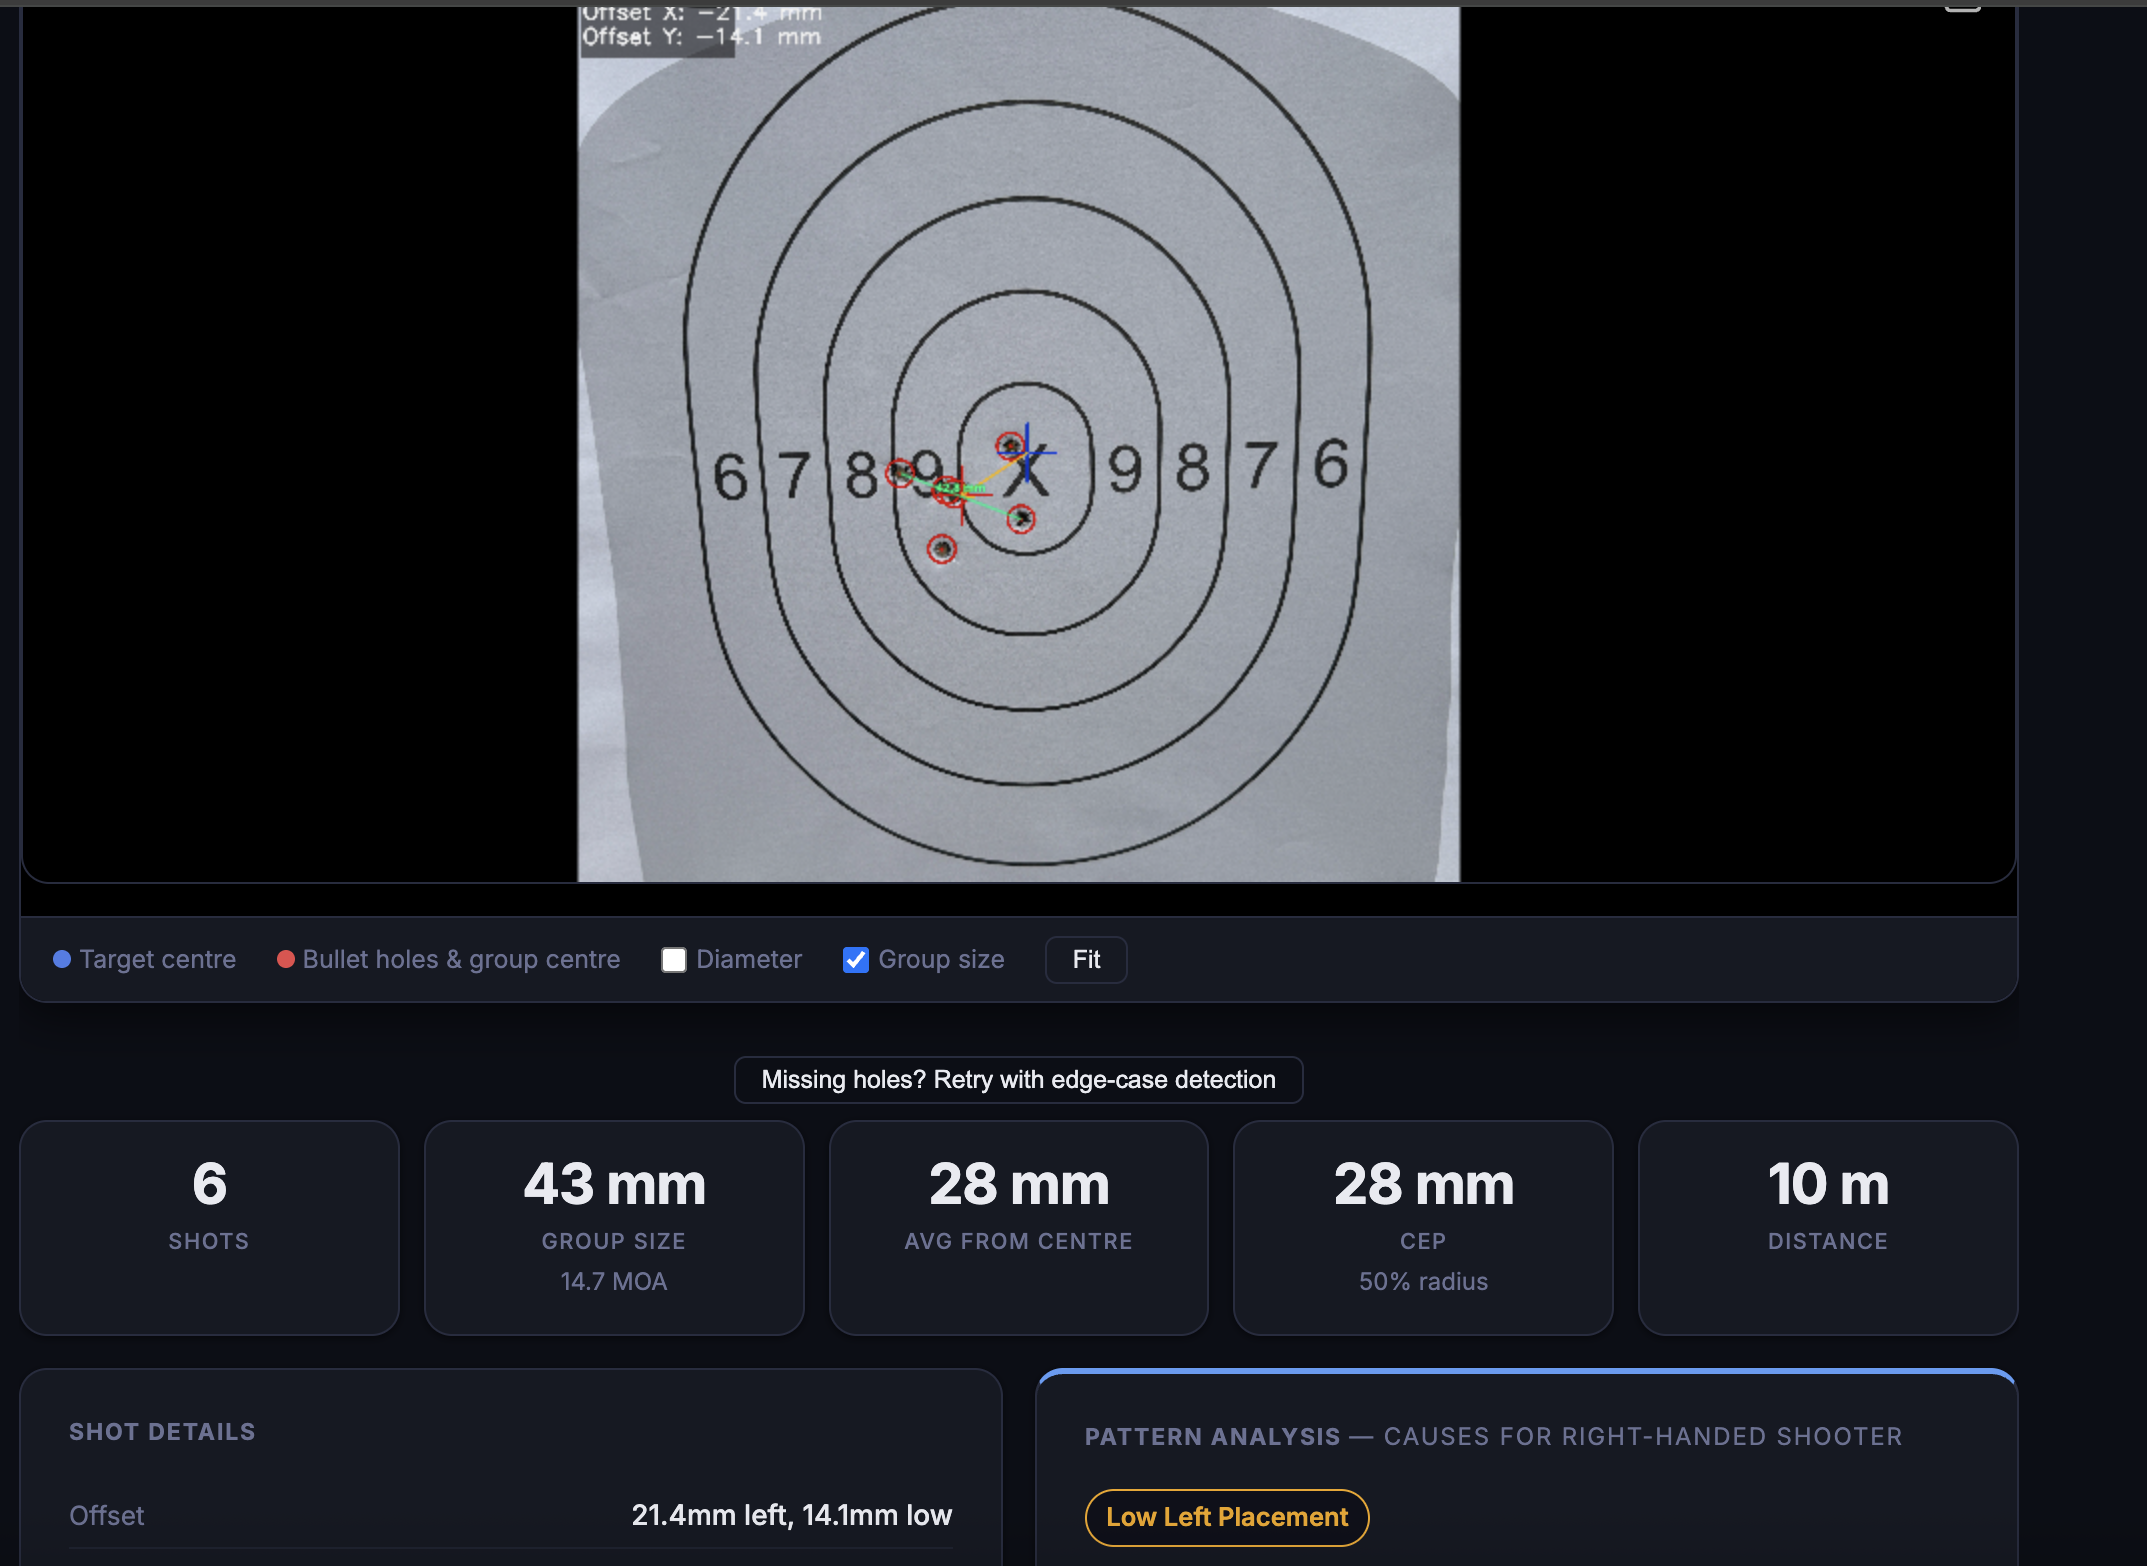 Low Left Placement detected automatically from a target photo - 6 shots, 43mm group at 10m
Left-handed shooters: your mirror pattern is low-right (4 to 5 o'clock). Everything in this article applies to you, just flip the direction.
What Causes Low-Left Groups
A shot lands low-left when the muzzle moves down and to the left between the moment you commit to the shot and the moment the bullet exits the barrel. That window is tiny, but the muzzle does not need to move much. At 7 yards, a 1-degree shift sends the bullet about 1.5 inches off center.
Three things account for nearly every low-left group:
- Trigger finger mechanics pulling the muzzle sideways
- Anticipation or flinch pushing the muzzle down
- Grip imbalance letting the gun torque under recoil prep
Most shooters have a blend of two of these. Fixing one often exposes the other, which is why low-left can feel stubborn until you address the real combination at work.
Trigger Control Issues
The trigger needs to travel straight back. When a right-handed shooter curls too much finger around the trigger, the fingertip pushes the trigger to the left as it presses rearward. The muzzle follows, and the shot lands left of center.
Finger placement
The pad of the distal phalanx (the fingertip, roughly between the tip and the first joint) should contact the trigger face. Too much finger wraps around and drags the frame left. Too little finger (the very tip) can slip and cause inconsistent contact. A quick check: with the gun unloaded, press the trigger slowly and watch the front sight. If it drifts left during the press, adjust your contact point until the sight stays still.
Trigger press speed and smoothness
Jerking the trigger is really just a fast, uncontrolled press. The problem is not speed itself, it is that an abrupt contraction of the trigger finger recruits neighboring muscles in the hand. Those muscles clench the grip and shift the muzzle. A smooth, continuous press isolates the trigger finger from the rest of the hand. With practice, you can press smoothly at high speed, but you have to build the isolation first.
Anticipation and Flinch
Your brain knows a loud explosion is about to happen inches from your face. It is completely natural to brace for it. The problem is that bracing happens before the shot breaks, not after.
Anticipation typically shows up as a slight downward push with the shooting hand, sometimes combined with a forward dip of the shoulders. The shooter is pre-loading against expected recoil. Because the strong hand (right) is doing most of the pushing, the force goes down and slightly left, giving you the classic low-left cluster.
How to tell if you are flinching
The best diagnostic is a ball-and-dummy drill (covered below). If you dry-fire a dummy round and the muzzle dips, you are anticipating. You can also have a training partner randomly load snap caps into your magazine. The rounds you do not know about will reveal the flinch instantly.
Flinch is not a sign of inexperience. Even competitive shooters deal with it periodically, especially after long strings of heavy recoil or after time away from the range.
Grip Problems
A weak or uneven grip does not directly cause low-left, but it makes every other problem worse. Two grip issues show up most often:
Insufficient support-hand pressure
In a modern thumbs-forward grip, the support hand (left hand for a right-handed shooter) should provide roughly 60% of the total grip pressure. Many shooters under-grip with the support hand, which means the strong hand is doing all the work. When the strong hand also has to manage the trigger, it is easy for grip pressure to shift during the press. The muzzle wanders.
Squeezing on the shot
Some shooters unconsciously tighten their whole grip as they press the trigger, a sympathetic squeeze. The pinky and ring finger clench, the wrist locks, and the muzzle gets driven down-left. Grip pressure should be set before the trigger press begins and should not change during the shot.
How to Diagnose the Cause
You know you are hitting low-left. But is it trigger, anticipation, grip, or a combination? Here is a practical sequence to isolate the cause:
- Dry-fire test. Aim at a small dot on the wall (gun unloaded, triple-checked). Press the trigger and watch the front sight. If the sight moves left, you have a trigger mechanics issue. If it dips down, you are anticipating. If it stays dead still, the issue may only appear under live fire.
- Ball-and-dummy. Load a magazine with a random mix of live rounds and snap caps. Shoot normally. On the dummy rounds, watch what happens. A dip or push confirms anticipation.
- Support-hand-only. Shoot a few rounds with just your support hand. If your group shifts dramatically when you remove the strong hand, your trigger press is influencing the muzzle more than you think.
- Track your patterns over time. A single range session gives you a snapshot. Real diagnosis comes from seeing whether the pattern is consistent across sessions, distances, and guns. This is where tools like Shotalyze help, upload your target photos and the app tracks your patterns automatically so you can see if low-left is chronic or situational.
Drills That Fix It
Once you know the root cause, pick the drill that targets it. Run these at short distance (3 to 5 yards) where you can see the results clearly, then gradually push the distance out as the pattern cleans up.
Wall drill (trigger mechanics)
Stand about an arm's length from a blank wall. Aim at a small mark. Press the trigger on an unloaded gun, focusing entirely on keeping the front sight motionless. No target to score means no performance pressure, just pure trigger isolation. Do 50 reps per session. This is the single best drill for building a clean trigger press.
Ball-and-dummy drill (anticipation)
Mix snap caps into your loaded magazine at random. Shoot at a target normally. Every time you hit a snap cap, you will see exactly what your hands do in anticipation. Over time, your brain learns that not every trigger press produces recoil, and the flinch diminishes. Start with a 50/50 mix, then gradually reduce the dummy rounds as the flinch improves.
Penny drill (grip and stability)
Balance a penny or empty casing on the front sight. Dry-fire without letting it fall. This forces you to maintain consistent grip pressure and a smooth trigger press simultaneously. If the penny falls, something moved. It is immediate, honest feedback.
One-hole drill (putting it together)
At 3 yards, fire five rounds trying to put them all through the same hole. This is not about group size as a metric, it is about forcing yourself to execute every fundamental on every shot. When all five land in a ragged single hole, you know your mechanics are working. Photograph the target, run it through Shotalyze, and you will get a measured group size and pattern diagnosis you can compare against your next session.
Cadence drill (speed pressure)
Set a shot timer for 2-second intervals. Fire one round per beep. The time pressure will surface any latent anticipation that does not show up during slow fire. If your group opens up or drifts low-left under the timer, you know anticipation is still in play. Gradually tighten the interval as your mechanics hold up.
Putting It All Together
Low-left is not a mystery. It is almost always trigger mechanics, anticipation, or grip, usually two of the three. Diagnose which ones apply to you, pick the drills that target those causes, and run them consistently for a few range sessions. Most shooters see meaningful improvement within two to three focused practice sessions.
The key is honest feedback. Your target does not lie. If you are not sure how to interpret what you see on paper, read our guide on how to read your shot groups. Make one adjustment at a time, and track the results over time so you know what is actually working.
See it in action: Upload a target photo to Shotalyze and get instant pattern detection with specific causes and fixes for your shooting hand.